


Essential Tools for Flawless Hardwood Floor Installation

Nearly 75% of homeowners prefer hardwood floors for their durability and timeless appeal. Yet, diving into hardwood floor installation without the right tools can turn a dream project into a nightmare. This guide lays out the essential hardwood floor installation tools checklist to ensure your project goes smoothly from start to finish. Whether you're a DIY enthusiast or a seasoned pro, having the right gear at your fingertips is crucial for achieving those perfect, squeak-free floors.
Key Takeaways
- Get the right tools before you start. Make sure you have all essential tools listed in the article, like hammers, saws, and trowels, to make your hardwood floor installation smooth.
- Safety first. Always wear safety gear such as goggles and gloves to protect yourself during the installation process.
- Measure twice, cut once. Use accurate measuring tools to ensure your hardwood floors fit perfectly and look professional.
- Follow best practices. Apply the proper installation techniques discussed to avoid common mistakes and ensure a long-lasting floor.
- Invest in quality power tools and fasteners. These can make a significant difference in the ease and speed of your installation project.
- Remember, preparation is key. Properly preparing your workspace and materials can save you time and trouble in the long run.
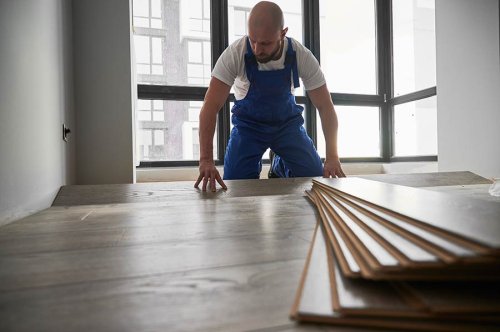
Essential Tools for Hardwood Flooring
Tape Measure
Accurate measurements are crucial. A tape measure ensures you cut planks perfectly. This avoids waste and ensures a snug fit.
Without it, you risk uneven flooring. It's the first tool you grab.
Flooring Nailer
A flooring nailer is key for securing planks. It makes the job faster and more efficient. You can't install hardwood floors well without one.
It drives nails at the correct angle and depth. This keeps floors stable and beautiful.
Rubber Mallet
A rubber mallet helps fit boards tightly together. It's gentle yet effective. Using it prevents damage to the wood.
It ensures a smooth, gap-free surface. Every board fits just right with its help.
Safety Gear and Preparation
Eye Protection
Wearing safety goggles is crucial. They shield your eyes from flying debris. This can happen when cutting wood.
Always put them on before starting work. It keeps your vision safe.
Knee Safety
Knee pads are a must. They prevent knee strain.
Hardwood floor installation involves a lot of kneeling. Without pads, this can hurt over time.
Air Quality
Ensure good ventilation. This helps avoid dust inhalation.
Opening windows can help. Also, using fans makes a big difference.
After discussing essential tools, focusing on safety gear is key. Proper preparation prevents accidents and health issues during hardwood flooring projects. Wearing safety goggles protects eyes from sharp particles that can fly up unexpectedly. Knee pads are equally important as they cushion the knees against hard surfaces, reducing pain and potential long-term damage. Good ventilation cannot be overlooked either; it ensures that the air remains clean, minimizing the risk of inhaling harmful dust particles.
Accurate Measuring Tools
Carpenter's Square
A carpenter's square ensures perfect angles. It's a must for hardwood floor installation. This tool helps in making precise cuts. You can check corners are right angles with it.
Carpenter's squares are easy to use. They guide you in cutting straight. This makes your floor look professional.
Chalk Line
Use a chalk line for straight cuts. It's vital for long, straight lines across your room. Snap the line, and you have a guide.
A chalk line saves time. It makes sure your planks align well. This step is crucial before you start laying down the floor.
Laser Level
Employ a laser level for an even floor. It projects straight lines on surfaces. These lines help in keeping your floor level.
Laser levels are great tools. They ensure your hardwood floors are flat across the room. This avoids uneven spots that can trip people.
Proper Installation Techniques
Starting Point
After picking the right measuring tools, choosing where to start is crucial. Begin the installation from the longest wall. This helps in maintaining a straight line across the room. It makes sure your floor looks even and well laid out.
Starting from the longest wall also uses less wood. You cut fewer pieces to fit. This saves time and materials.
Staggering Joints
Stagger end joints for a more natural look. This step is key in avoiding a patterned or artificial appearance. It strengthens the floor too.
Make sure no two end joints line up or are too close. Aim for at least 6 inches apart. This technique adds beauty and durability to your hardwood floors.
Expansion Gap
Leave an expansion gap around the room perimeter. Wood expands and contracts with changes in humidity. An expansion gap prevents buckling.
The gap should be about a quarter of an inch wide. It allows the wood to move without damaging the floor or walls.
Best Power Tools and Fasteners
Miter Saw
A miter saw makes precise cuts. This tool is key for fitting planks around corners. It ensures tight seams.
Cutting angles are easy with it. You get clean lines every time.
Power Drill
A power drill speeds up fastening. It's a must for securing floorboards quickly.
This tool drills pilot holes fast. Pilot holes prevent wood from splitting.
Nails and Staples
Choose high-quality nails and staples. They hold floors together longer. Durability matters here.
Steel nails resist bending. Stainless staples won't rust. Both keep floors smooth and even.
Final Remarks
Equipping yourselves with the right tools and knowledge is key to a successful hardwood floor installation. From essential gear, accurate measuring tools, to the best power tools and fasteners, you've got what it takes to tackle this project head-on. Safety isn't just a precaution; it's a necessity. Ensuring you're well-prepared with safety gear and the correct installation techniques will not only make the process smoother but also safeguard your well-being.
Now, it's time to put this checklist into action. Dive in with confidence, knowing you're fully equipped to bring your hardwood flooring vision to life. Your space is about to get a major upgrade. Ready, set, install! And remember, if you ever feel stuck, revisiting these tips can provide the guidance needed to cross the finish line. Let's make those flooring dreams a reality!
Frequently Asked Questions
What tools are essential for installing hardwood floors?
You need a variety of tools including a tape measure, hammer, saw, flooring nailer, and spacers. These tools ensure precise cuts and secure installation.
What safety gear should I use during hardwood floor installation?
Always wear safety glasses, knee pads, and work gloves to protect yourself from injuries while cutting and installing the flooring.
How important are measuring tools in hardwood floor installation?
Accurate measuring tools like a tape measure and carpenter's square are crucial for precise cuts and alignments, ensuring your flooring fits perfectly.
Can you explain proper installation techniques for hardwood floors?
Proper installation involves careful planning of the layout, ensuring the first row is straight, and using the right fasteners and tools to secure the planks.
What are the best power tools to use for hardwood flooring installation?
A power saw for cutting planks to size and a pneumatic flooring nailer for securing them are essential for efficient and effective hardwood floor installation.
Why are fasteners important in hardwood floor installation?
Fasteners, such as nails or staples, are vital for securely attaching the hardwood planks to the subfloor, preventing movement and squeaks.
How does preparation affect the outcome of hardwood floor installation?
Good preparation, including acclimating the wood and ensuring a clean, level subfloor, is key to a successful and long-lasting hardwood floor installation.